


Products & Services
To provide high-quality services and affordable in-game products for all players.
 Popular
Diablo 4 Items
 Popular
Diablo 4 Gold
 Leveling
Diablo 4 Carry Run
 Leveling
Diablo 4 Boosting


 Popular
POE 2 Currency
 Popular
POE 2 Items
 Popular
POE 2 Quick Gold
 Popular
POE 2 Coaching
 Popular
POE 2 Accounts
 Leveling
POE 2 Boosting



NEWS
Any latest news, guides, rumors, teasers and more about Diablo 4
-
All-New D4Gold.com Points System Guide: Daily Check-ins, 10x Points on First Orders, and Comparing VIP Discounts vs. 8% Discount Codes
Welcome to D4Gold.com! To thank you for your continued trust and support, we are officially launching the all-new D4Gold Points System, designed to bring you more rewards and flexible shopping benefits.
Whether you are a newly registered user, a long-time VIP member, or a returning customer, you can earn Points through daily check-ins and by completing eligible orders. These Points can then be used to directly offset the cost of future purchases.
This guide covers how to earn Points, the 10x reward for your first order, Points validity, Points calculations following refunds, and how to choose between Points, VIP Discounts, and Discount Codes.
Points System Requirements
D4Gold Points are available exclusively to registered and logged-in users. Upon registration, your account automatically starts at VIP Level 1, currently offering a 1% discount. As your cumulative spending increases, your VIP Level can rise:
- VIP Level 1: 1% OFF
- VIP Level 2: 2% OFF
- VIP Level 3: 3% OFF
- VIP Level 4: 4% OFF
- VIP Level 5: 5% OFF
VIP Discounts and Points can be used simultaneously. By consistently using the same D4Gold account, you can accumulate Points while enjoying higher order discounts as your VIP Level rises.
Points, VIP Levels, and other account benefits are tied to your specific account and cannot be transferred, merged, or gifted to other accounts.
How to Earn Points?
Currently, there are two main ways to earn Points: daily check-ins and completing eligible orders.
Daily Check-in Points
Earn Points by logging in and completing the daily check-in. The longer your consecutive check-in streak, the more Points you earn each day:
- Day 1: 8 Points
- Day 2: 10 Points
- Day 3 and beyond: 12 Points per day
If you miss a day, your consecutive check-in streak resets. Your next check-in will start over at Day 1 rate (8 Points) rather than continuing at the 12-point daily rate. Daily check-ins are calculated based on the refresh time of the time zone where your D4Gold account was registered.
Checking in close to the refresh time carries a risk of missing the day's check-in because of network latency or page loading issues; this would break your consecutive check-in streak, causing the count to reset to Day 1 (8 Points) upon your next check-in.
Therefore, to ensure you consistently maintain your consecutive check-in rewards, we recommend completing your daily check-in well before the refresh time.
Where to Check In?
D4Gold offers multiple access points for check in, so you don't have to search for the specific page every time:
1. Go to My Account → Check In and click the current date on the calendar or CLAIM POINTS TODAY button at the bottom of the page.
2. Click CLAIM POINTS TODAY on My Orders, Personal Settings, or My Coupon pages.
3. Click Claim Now & Save More banner on the homepage for quick access to the check-in page.
4. Visit VIP Member page and click CLAIM POINTS TODAY to check in and collect the day's Points.
5.Click Claim Now & Save More banner directly on any product page to complete your daily check-in while browsing products.
Order Points
In addition to daily check-ins, you can also earn Points by completing eligible orders on D4Gold.com.
The base earning rate for standard orders is: $1 spent = 1 Point
Points are calculated based on the order subtotal. Amounts with decimals are rounded to the nearest whole number.
For example:
- An order of $55.26 earns 55 Points.
- An order of $41.56 earns 42 Points.
However, Points are only awarded for orders with a subtotal of $5 or more.
Orders with a subtotal below $5 do not generate Points. If you plan to purchase multiple items, consider combining them into a single order to avoid missing out on Points due to a low order value.
When are Points Credited?
Points are not credited to your account immediately after payment for a standard order.
Points are only added to your account once the order has been successfully completed and its status changes to Completed.
Points are not awarded for orders that are voluntarily cancelled, fully refunded, flagged for suspected fraud, or otherwise not successfully completed.
Therefore, it is normal for Points not to appear in your account immediately after a successful payment.
Partial Refund
If a partial refund occurs on an order for which Points have already been issued, the system will readjust Points generated by that order based on the refund amount and simultaneously return a proportional amount of Points used during the initial purchase.
Points earned from the order will be deducted based on the actual refund amount, so rounded to the nearest whole number.
If Points were used when placing the order, the returned amount is calculated using the following formula:
Returned Points = Points Used × (Refund Amount / Original Purchase Amount)
For example, suppose an account has 446 Points and places a $55.26 order, using all 446 Points to offset $4.46 of the cost.
This order would originally earn 55 Points.
If $15.02 of the order is subsequently refunded, approximately 15 Points must be deducted from the earned total, leaving a final balance of: 55 - 15 = 40 Points
446 Points originally used will be returned based on the refund ratio: 446 × ($15.02 / $55.26) ≈ 121 Points
The account will ultimately receive: 121 Returned Points + 40 Earned Points = 161 Points
Full Refund and Order Issue
If an order is voluntarily cancelled, fully refunded, flagged for fraud risk, or not successfully completed, no reward Points will be issued for that order.
Once an order has been successfully delivered and confirmed as complete, refund requests based on user-initiated reasons are not accepted.
If an order cannot be delivered and a refund is issued because of D4Gold.com's inventory, technical issues, or other internal factors, any Points used for that order will be returned based on the actual refund amount.
10x Points for New Users
Besides standard order rewards, newly registered users can earn 10x New Customer Points on their first eligible order.
Standard orders are calculated at: $1 = 1 Point
Whereas eligible first orders for new users are calculated at: $1 = 10 Points
For example, if a new user's first order has a subtotal of $50, they would normally receive: 50 × 10 = 500 Points
Based on the redemption rate of 100 Points = $1, this equates to $5 worth of Points that can be used for future orders.
First Order Under $5
A new user's first order is defined as the first successfully paid order placed on the account, regardless of whether that specific order earns Points.
For example, suppose a new account's first order is only $4.99.
Since the subtotal does not reach the $5 threshold, this order will not earn any Points, yet it will still be recorded as the account's First Order.
Consequently, even if a subsequent order reaches $50, the account will no longer qualify for the 10× New Customer Points promotion; Points will instead be awarded according to standard order rules.
Therefore, if you plan to purchase multiple items after registering, it is recommended to combine them into a single first order and ensure the subtotal is $5 or higher.
When 10× Points are Credited?
New Customer Points are subject to additional anti-fraud and risk assessment reviews.
Once the first order has been successfully delivered and confirmed free of refunds or irregularities, the 10× Points will be credited to the account within 24 hours.
Creating multiple accounts or repeatedly claiming New Customer Benefits via linked IP addresses, devices, payment accounts, or other methods may trigger the risk control system.
Points Value
D4Gold Points can be used directly at checkout to offset a portion of the order total.
The current redemption rate is fixed at: 100 Points = $1
Meaning: 1 Point = $0.01
For instance, having 500 Points in your account is equivalent to having $5 in credit to apply toward purchases.
Points are considered account rewards; they cannot be exchanged for cash, withdrawn, or transferred to other accounts.
Points Expiration
Points are valid for 90 days, with the validity period calculated individually for each batch of Points based on the date they are credited to the account.
For example, if a batch of Points is credited on Day 1, it will expire on Day 91. Points earned at different times have separate expiration dates; therefore, when accumulating Points over the long term, we recommend checking your balance regularly and using them wisely to prevent expiration after 90 days.
Maximum Points Deduction
The maximum deduction amount using Points is calculated in tiers based on the order subtotal:
Order Subtotal Max Points Deduction $5.00 - $39.99 7% $40.00 - $99.99 9% $100.00+ 11% The higher the order amount, the higher the maximum percentage that can be deducted using Points.
For example, on a $60 order, the maximum deduction using Points is approximately 9% (i.e., $5.40), corresponding to a maximum usage of about 540 Points.
The actual number of Points you can use also depends on your account balance.
Points + VIP Discount: Supported
Can Points be used in conjunction with VIP Discount?
Yes.
Points can be used alongside your account's VIP Discount.
For instance, a newly registered user with a VIP Level 1 status (1% off) can use Points to further reduce the actual payment amount on top of VIP Discount.
The higher VIP Level, the greater the total savings offered by this combination.
Points + Discount Code: Not Supported
Can Points be used with a discount code?
No.
Points and Discount Codes are two different promotional options and cannot be used simultaneously on the same order.
At checkout, the system compares:
- VIP Discount + Points
- Discount Code
The option that provides the better final price will be applied as Best Deal. You can also manually switch between available options at checkout.
Points vs. Discount Code
Which option offers better value depends on the discount currently available, your VIP Level, your order subtotal, and the number of Points in your account.
Points can be combined with your VIP Discount, while Discount Codes may offer different discount rates depending on the current promotion.
For example, larger orders allow a higher maximum Points deduction:
- $5.00 - $39.99: up to 7%
- $40.00 - $99.99: up to 9%
- $100.00+: up to 11%.
If you have enough Points available, combining Points with your VIP Discount may provide greater savings. However, if the current Discount Code offers a stronger discount or your Points balance is limited, Discount Code may be the better option.
Because Discount Code rates may vary, there is no fixed threshold at which one option is always better than the other.
Points are also valid for only 90 days. If the savings between the two options are similar, you may want to use Points that are close to expiring.
The final payable amount should always be based on Best Deal shown at checkout.
Frequently Asked Questions(FAQ)
Q1: Can I register multiple accounts to repeatedly claim the 10x Points offer for first-time orders?
A: We do not recommend doing this.
10x New Customer Points offer is subject to risk assessment. If the system detects multiple accounts sharing the same IP address, device, payment account, or other anomalous links, those accounts may be disqualified from receiving the promotional Points, and any rewards already issued may be revoked.
Accounts found to be seriously abusing the promotion may also face restrictions.
Q2: Can VIP levels and Points be transferred to another account?
A: No.
VIP levels, Points, and associated account benefits remain tied to the account where they were originally earned; they cannot be transferred, merged, or gifted to other accounts.
Therefore, if you plan to use D4Gold.com in the long term, we recommend sticking to a single account.
Q3: Can I restore my consecutive check-in streak if I miss a day because of network issues?
A:If a check-in is missed because of personal network latency or failure to check in before the daily reset, the record will reset according to standard rules; customer service cannot manually restore a missed day's check-in.
If the issue is confirmed to be caused by a widespread server outage or technical problem on D4Gold.com, a general announcement regarding Points compensation will be issued based on the situation.
Key Tips for New Users
For newly registered users, the most important Points rules can be summarized as follows:
- Upon registration, your account starts at VIP Level 1 with a 1% discount, and you can begin earning Points through daily check-ins and eligible orders.
- Make sure your first order reaches $5. First Order status is determined by the first successfully paid order. If your first order is only $4.99, it will still count as your First Order, but you will not receive the 10x Points bonus.
- Check in every day. After reaching a 3-day consecutive streak, you can earn 12 Points per day. If the streak is broken, your next check-in will restart at 8 Points.
- Use Points before they expire. Points are valid for 90 days from the date they are credited to your account.
- Compare VIP + Points with the current Discount Code at checkout. Discount Code rates may vary, so the better option depends on your VIP Level, Points balance, order subtotal, and the promotion currently available. The checkout page will automatically display Best Deal.
- Points are adjusted accordingly in the event of a partial refund. Points originally earned from an order will be deducted based on the refund amount, while Points already redeemed will be returned proportionally based on the refunded amount.
If you have any further questions about Points, orders, VIP benefits, or Discount Codes, please feel free to contact D4Gold.com online customer support.
D4Gold.com reserves the right of final interpretation regarding Points System and related promotional rules.
Sep 21, 2026
-
What PTR 3.3.0 Patch Notes Changes for Double Swing Barbarian in Diablo 4 Season 16?
The PTR 3.3.0 Patch notes bring good news: Barbarian is set to receive a significant buff in Diablo 4 Season 16, with Double Swing skill emerging as a major beneficiary.
If you're considering playing a Barbarian in Season 16, read on to learn about the upcoming changes and the key gameplay mechanics you should keep in mind.
Current Power Level
In the current state of Diablo 4, a Double Swing Barbarian is already capable of clearing Tier 125 of The Pit in about a minute. It can take down bosses in a fraction of the time, dealing damage in the 200-trillion range.
The core of this build revolves around high-speed, wide-area strikes, often paired with effects like Twister to rapidly clear the screen.
This clearing efficiency creates a positive feedback loop: the denser the mob pack, the more targets your Twister and other effects can hit, which in turn accelerates your stacking mechanics.
Even without gear perfectly enhanced via Sanctification, this build performs exceptionally well, demonstrating a strong foundation that excels at both speed-farming and pushing to higher tiers.
With the PTR 3.3.0 Patch notes promising further buffs to Double Swing, the potential for this build looks even more exciting.
Key Enhancements
Crucially, the buffs to Double Swing in Diablo 4 Season 16 aren't limited to the skill itself; they extend to its variants, and the associated gear sets.
First, the damage of Double Swing has been doubled, increasing from 75% to 150%. Additionally, the 40% casting speed penalty on Slice and Dice variant has been removed, ensuring that this playstyle is no longer hindered by a sluggish feel.
Building on this, you can simultaneously equip both Berserker's Crucible and Sescheron's Fury five-piece sets.
This combination provides a massive damage multiplier - roughly 600x - while further expanding the AoE (area of effect) and hit detection range for Twister or Slice and Dice, allowing you to clear screens even more effectively.
Although War Cry will see a reduction in effectiveness of approximately 26%, the changes to Double Swing result in a net gain for Barbarian - nearly doubling its potential - indicating an overall upward trend in power.
Frenzy has also received a significant boost, making it another skill worth testing once the PTR 3.3.0 goes live.
In short, with these multiple layers of buffs, Double Swing Barbarian in D4 Season 16 PTR is no longer just a viable build; it now shows clear potential for pushing into higher tiers of performance.
Gear Setup
Based on the information currently available in PTR 3.3.0 Patch notes: How can we construct a Double Swing Barbarian that is as powerful as we envision?
First, you can utilize Melted Heart of Selig to bolster Barbarian's survivability. If you have access to Enigma, clearing Tier 125 of The Pit becomes a much more reliable prospect.
Additionally, you should prioritize the following Diablo 4 items:
- Fists of Fate
- Tibault's Will
- Boots equipped with Earthstriker's Aspect
- Ramaladni's Magnum Opus
- Insight
- Ring of Red Furor
- Vehement Halo with Crushing Aspect
These items will help elevate both the damage output and the overall fluidity of your Double Swing Barbarian.
Regarding gloves, Fists of Fate remain superior to Twin Strikes in practical application; the latter offers limited Vulnerable uptime, still requiring Exploit glyph to ensure Vulnerable status is consistently applied.
As the build shifts toward stacking Maximum Life, your approach to survival on the battlefield must also evolve: by leveraging Sescheron's Fury to gain roughly 40% additional Life, you maintain a solid margin for error.
You can flexibly swap out pieces of this gear and these mechanics.
Before the PTR goes live, take some time to study how to ensure your Double Swing Barbarian maintains both damage output and survivability across various environments - and then put that knowledge into practice once the PTR begins.
Skill Highlights
For the PTR 3.3.0, you should build around Shout skills and Double Swing.
If you want your Barbarian to focus more on single-target damage, you can invest in Flurry within Skill Tree for additional utility; however, if you are pushing to higher tiers of The Pit in the PTR, opting for Slice and Dice will be more effective in clearing groups of enemies.
If you wish to enhance your mobility, Leap and Lunging Strike are excellent choices - the former provides vertical movement (effectively a triple-jump), while the latter features a very short cooldown, allowing for frequent forward dashes.
Combining these skills with your Shout abilities enables Barbarian to effectively adjust positioning and maintain a steady offensive rhythm in Diablo 4.
One-Handed Weapon Expertise
Additionally, Barbarian's one-handed weapon expertise has been updated in PTR 3.3.0 Patch notes, significantly increasing their tactical value.
Most notably, you can slot Mace Expertise in your Technique slot to gain a massive damage bonus - nearly 20x - against stunned enemies.
Crucially, the enhancements to this expertise in Season 16 also apply during boss encounters, effectively overcoming the traditional limitation that bosses could not be stunned.
In short, the synergy between Barbarian's various expertise mechanics opens up more possibilities for weapon selection and ensures a higher damage ceiling for Double Swing Barbarian in the new season.
Diablo 4 PTR 3.3.0 is launching soon - get ready to kick off your journey with a Double Swing Barbarian!
Oct 26, 2026
-
Diablo 4 Season 15 Crux of the False Prophet Farming Guide | Which Endgame Activities Have the Best Key Drops?
Although Mythic Unique drop rates have improved in Diablo 4 Season 15, these items remain extremely rare, with a drop rate of only around 0.4% even at Torment 12.
Echo of Mephisto is the most reliable source of Mythic Uniques in Diablo 4 Season 15. Since Patch 3.2.1, defeating Echo of Mephisto and opening Mephisto's Hoard guarantees at least one Mythic drop.
If you receive a Mythic Unique you don't need, you can salvage it into a Resplendent Spark. This means you can farm Mythic gear while accumulating more Resplendent Sparks. However, opening Mephisto's Hoard requires one Crux of the False Prophet each time, and these keys are quite rare.
Preparation
First, it's recommended that you reach at least Tier 10, as this is the threshold for starting to obtain these rare keys and accessing content related to Echo of Mephisto.
Next, open War Plans and navigate to Helltide tree to unlock Hell's Prize node. This is the core node for this farming strategy because it unlocks special Hell's Prize Chests in Helltides.
Each Hell's Prize Chest requires 666 Aberrant Cinders to open, but it offers a substantial amount of Diablo 4 items and a chance to drop a Crux of the False Prophet.
With some luck, you can collect several keys simply by opening these chests. Of course, drops aren't guaranteed, and RNG still plays a major role. However, whenever a Hell's Prize Chest appears, opening it should be your priority.
Keep in mind that only one Hell's Prize Chest spawns in each zone. If a Helltide appears in both an Original Zone and Nahantu, each zone will have one chest. If Helltide only appears in an Original Zone, only one chest will spawn.
Other Optional Nodes
If you plan to carry a large number of Aberrant Cinders, consider unlocking an optional War Plans node called Undying Embers. Normally, dying during a Helltide causes you to lose half of your Aberrant Cinders.
Losing half your Cinders after carrying 2,000 or 3,000 can be extremely frustrating. Undying Embers prevents you from losing Cinders when you die. This node is particularly useful for players who struggle to survive at higher difficulty levels or whose builds occasionally get them killed.
However, this node is entirely optional. If your build is already strong enough to keep you alive most of the time, you don't need it. Remember to use all your Cinders before Helltide ends, as any unused Aberrant Cinders cannot be carried over to the next Helltide.
Helltide
When opening chests, it's recommended that you allocate your Aberrant Cinders in the following order of priority:
- Hell's Prize Chest: Open these first. Each costs 666 Aberrant Cinders and has a valuable loot pool, making it an important source of Crux of the False Prophet.
- Mystery Chest: Open these next. Each costs 250 Aberrant Cinders and also has a chance to drop a Crux of the False Prophet.
- Tortured Gift Chests: Use your remaining Cinders on these, including chests that require fewer Cinders. Although their overall value is lower, they can still drop the keys you need.
This approach helps you make the most of all Aberrant Cinders you collect instead of letting them go to waste.
Keep in mind that Crux of the False Prophet remains a rare drop. You might get several keys in a single farming session, while another session might yield none at all. Don't expect every chest to reward you with a key.
Ruptures Events
Opening the chests mentioned above requires a large supply of Aberrant Cinders. One of the faster ways to farm them currently is to run Ruptures events during Helltides.
Ruptures spawn large numbers of monsters, allowing you to collect Aberrant Cinders quickly by continuously killing enemies. With an efficient group, you can gather around 2,000 Aberrant Cinders in approximately 15 minutes while Ruptures events are active. That's enough to open a Hell's Prize Chest, a Mystery Chest, and several other Tortured Gift Chests.
Grouping up is strongly recommended because it makes the entire process much faster. You can also follow other random players who are already farming Ruptures. You don't need to do everything yourself. Just stick with the group, keep killing enemies, and collect as many Cinders as possible.
Prime Evil Echo
Farming Ruptures has another advantage. While collecting Aberrant Cinders, you're also completing open-world activities, which gives you a chance to encounter a Prime Evil Echo and claim its rewards.
Watch for Prime Evil ambush warnings on the mini-map. Sometimes, other players in the same Helltide instance will trigger a nearby Prime Evil Echo. When you see a warning, head to the indicated location as quickly as possible and join the fight to avoid missing out on these additional rewards.
Other Ways to Obtain Crux of the False Prophet
Helltides aren't the only source of Crux of the False Prophet. These keys can also drop from other endgame activities, including:
- Kurast Undercity
- World Bosses
- Lair Bosses
- The Pit
- Whisper Caches
- Seasonal Journey rewards
Therefore, you still have a chance to obtain keys while completing your regular endgame activities outside Helltides. However, aside from Greater Lair Bosses, which have a comparatively higher drop rate, the chances of obtaining a key through other methods are generally very low. Treat any key you find this way as a bonus.
Crux of the False Prophet is also tradable. If you want to focus on farming Mythic items, you can also buy Diablo 4 Crux of the False Prophet. Mephisto's Hoard contains more than just Mythic Uniques. It can also reward you with Mythic Seals and other valuable endgame loot.
If you want to strengthen your character for Diablo 4 Season 15 endgame, check whether you've already accumulated a good supply of Crux of the False Prophet. If you can't defeat Mephisto on your own, you can team up with other players. However, the rewards from the hoard cannot be shared between party members.
Oct 23, 2026
-
Diablo 4 Season 15 Guide to Saving Duplicate Splinters | How to Save Rare Loot With a Party Member
Patch 3.2.3 for Diablo 4 fixed a Splinter-related bug that could cause quest progression to become stuck. It was a welcome improvement, but the issue with Splinters of Evil remains unresolved.
Splinters of Evil still cannot be stacked, and players cannot pick up duplicates, meaning these drops go to waste. Since the official team has yet to address this issue, it appears that this behavior is being treated as an intended mechanic. However, if you do not want to waste Splinters you have farmed, there is a slightly more complicated workaround that allows you to collect them.
Why Are Duplicate Splinters Going to Waste?
Splinters of Evil are one of the core mechanics of Hell's Legacy season. Players need to collect them to unlock the corresponding Prime Evils and their exclusive Reputation Boards.
Each player can carry only one Splinter of each type in their inventory. Unlike ordinary Diablo 4 items, these Splinters cannot be stacked.
For players who spend hours farming two-boss encounters in the endgame, finding a rare Splinter should be a pleasant surprise. However, getting a duplicate that cannot be picked up is simply frustrating.
Each Splinter is tied to specific endgame activities. For example, Splinter of Terror enhances Helltide and Infernal Hordes, Splinter of Destruction enhances Dark Citadel and Lair Bosses, while Splinter of Hatred corresponds to The Pit and Nightmare Dungeons.
Players can switch between Splinters depending on their farming goals, but they must visit Greater Nightmare Awakening activity to obtain other Splinters before switching to the corresponding Reputation path. Since duplicate Splinters cannot be picked up directly, players have to find a way to preserve these rare drops or abandon them, making inventory management more difficult and increasing the risk of wasting valuable items.
How to Pick Up Duplicate Splinters of Evil?
The key is to have another player remain in your original game instance so that it does not close. You then leave the game, switch to a character that does not have Splinter you want, and rejoin the other player's party to return to the original instance and pick up Splinter on the ground.
The assisting player does not have to be a friend. Any online player can help. In theory, a random player cannot steal or trick you out of Splinter on the ground, but there is still a risk that they might disconnect or encounter other issues.
Step-by-Step Instructions
When you obtain a Prime Splinter or another type of Splinter while farming, and your current character already has one of the same type, you can proceed to the next step.
Invite a friend or any online player to join your party. They only need to remain in your game instance to keep it open. You can also help each other in return. If both of you have multiple chests or bags to open, you can take turns keeping each other's instances active.
Leave your current game and switch to the character that needs Splinter. This can be an existing alt or a newly created character. You can even switch characters in Torment 12 drop scenarios, making this method relatively convenient.
When the prompt appears, your friend must select the option to decline. They should not follow you into the new game instance or return to their own world state. Instead, they must remain in your original instance.
Once you launch the game normally with your new character, you will enter a new instance. You can then ask your friend to invite you back to the party, allowing you to return to the original instance.
After returning, Splinter of Terror on the ground will still be there. Since your new character does not have that Splinter, you can pick it up successfully. This prevents duplicate Splinters from going to waste.
Wirt's Lucky Coins
Helltide remains one of the better farming options. Select Diablo's Primeval Power to obtain substantial Helltide rewards and Reputation.
By coordinating with a teammate to keep your game instance active while you switch characters, you can use an alt to collect duplicate Splinters that your main character cannot pick up.
Once your alt has collected all three types of Prime Evil Splinters, you can combine them in Horadric Cube to craft Wirt's Lucky Coins. You can then transfer the coins to your main character through the shared stash and use them to open Uber Tristram challenge.
Reputation Caches
Since Reputation rewards can also contain Splinters, you can leave your Reputation Caches unopened and save several of them to open all at once in town. If you receive a duplicate Splinter that cannot be picked up, you can immediately use Horadric Cube to combine three Splinters you already have into coins. This frees up space and allows you to pick up the new drop from the ground.
The official team has hinted that mechanics related to Hellfire Torch may continue to be part of Diablo 4, so Splinters of Evil and Prime Evils could remain relevant. Even if you do not need them right now, you may still find this workaround useful in the next season.
Oct 22, 2026
Why Players Choose Us?
To provide high-quality services and affordable in-game products for all players playing Diablo 4.

D4Gold.com guarantees the safety of all property, privacy and personal information when you buy Diablo 4 in-game products/services on this website. Your Diablo IV accounts will not encounter any unexpected risks due to shopping behaviors generated on D4Gold.com.

The price of Diablo IV products or services sold on D4Gold.com is generally the lowest in the entire market, no matter which server you need D4 products or services on. You can get better discounts by claiming holiday offers, participating in affiliate programs to get more products at lower prices.

On the premise that all the information you fill in is correct, D4Gold.com will reconfirm your order and deliver the products you ordered accurately. The entire process can generally be completed within a short time unless you have any additional requests.

When D4Gold.com has to delay delivery or is unable to deliver the Diablo IV products or services you purchased due to force majeure, you can apply to us for a refund at any time. We will arrange a refund for you after confirming your info. And, we are deeply sorry for the trouble caused to you, and promise to server you better!
Here’s Our Step-By-Step Guide on How You Can Buy DIABLO 4 Products Safely
As a gamer service provider, we have a 100% secure and complete transaction system and dozens of payment methods. During the entire transaction process, D4GOLD will ensure the safety and normal operation of all players' accounts. All products/services sold by D4GOLD are legally obtained and have been reviewed by specialists. We will follow local laws and take corresponding measures to crack down on all illegal acquisitions;
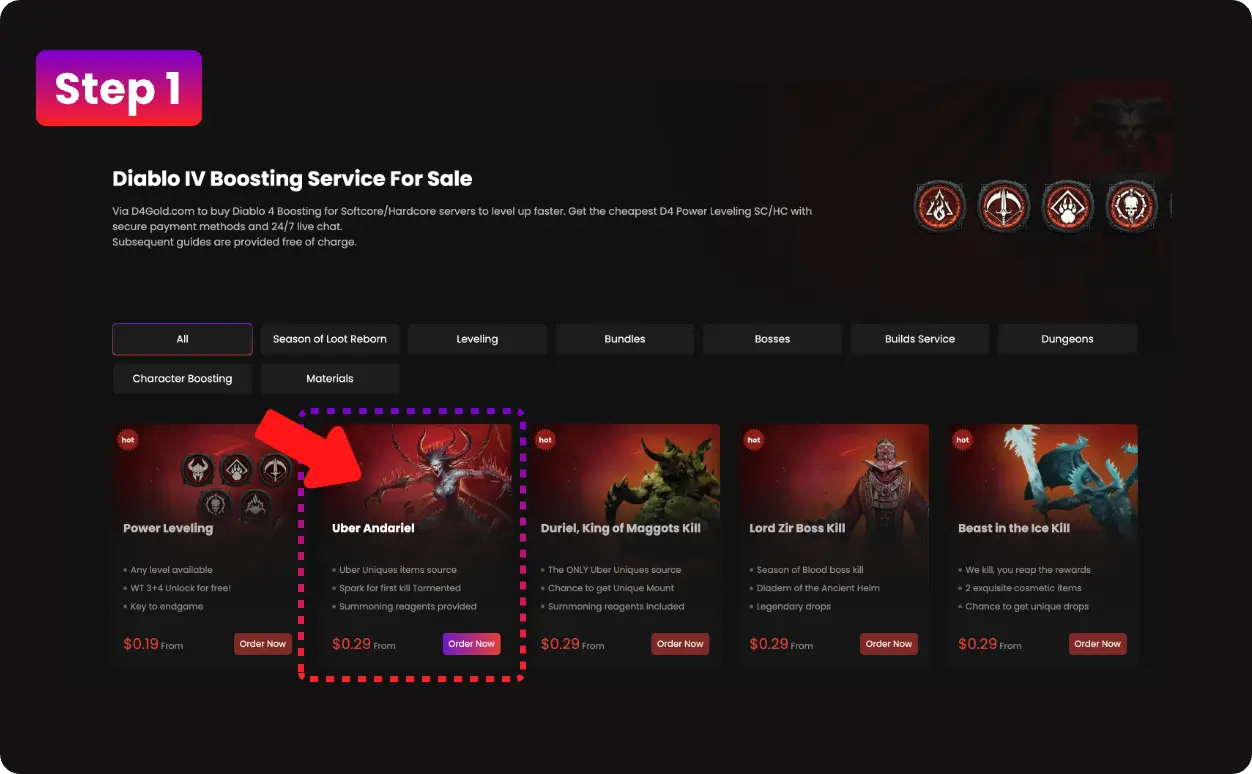
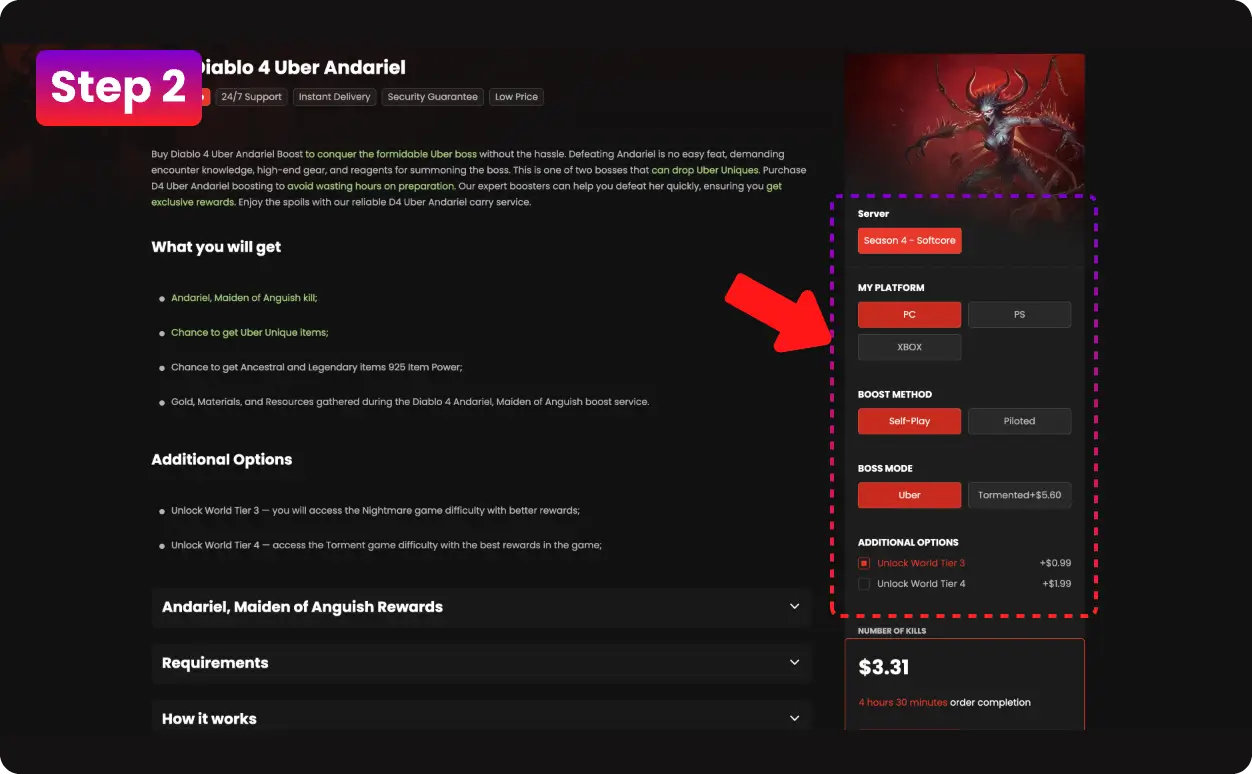
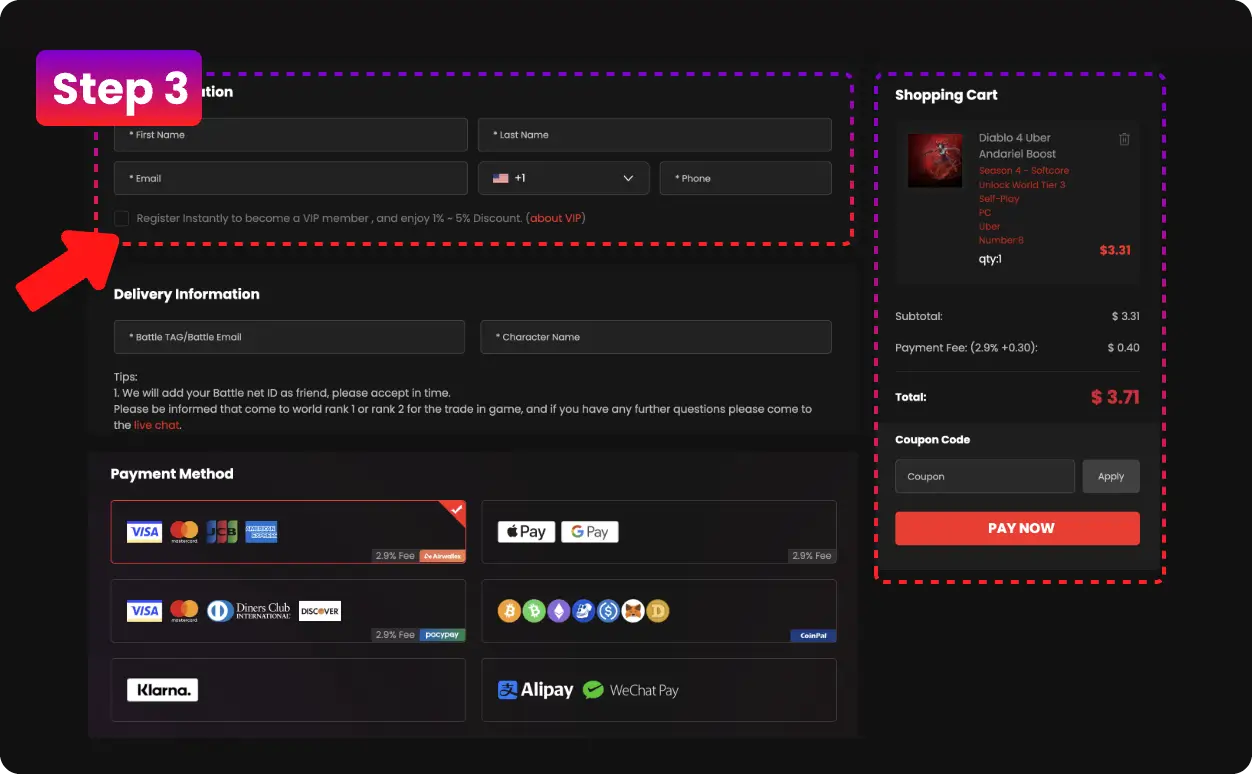
Click the product or service you want to buy, such as Gold, Items, Boosting, and follow the steps below to continue
Please note that you should not place the wrong order on the wrong server, otherwise we can't deliver it. Before you add the products or service you want to buy to shopping cart, please be sure to confirm it again and again. Then, enter the checkout page or continue shopping.
Please fill in "User Information" and "Delivery Information" on the checkout page truthfully and read the Tips carefully to avoid our staff being unable to successfully deliver the product or service you ordered. In addition, all available payment methods on D4Gold are 100% safe, enough to protect your property and privacy from being damaged and leaked.
You can contact us through [email protected] or Online Service for all questions and questions you have on D4Gold.com We will explain in detail the questions you have encountered and guide you in the steps to obtain Diablo IV products or services you want most or related game guides.
Frequently Asked Questions
How To Register A Member On D4Gold.com?
There are two registration methods for D4Gold:
(1) Enter your email address and password twice on the registration interface, check "I accept Terms and conditions and Privacy Policy" and "I want to get information about activities, sales and personal offers", and click "Sign Up" to complete the registration.
(2) You can register a member with social networks, such as Facebook, X, Google, Twitch, Steam, Reddit and Discord.
How To Track My Order After Payment?
There are several ways for you to track and check your order status after payment:
(1) You can directly enter the order number in the search box at the top of D4Gold homepage to check the order status.
(2) You can get notification emails from D4Gold.com when payment is made, when there is a problem with the order and when the order is completed.
(3) You can contact us via LiveChat to check your order easily by the help of our agents.
How To Place An Order?
Step 1: Choose Products/Service
Step 2: Select Your Server
Step 3: Select/Type The Amount You Want
Step 4: Click "ADD CART" or "BUY NOW"
Step 5: Click "CHECKOUT" or Continue Shopping
Step 6: Fill In All Information, Select One Payment Method To Pay Over.
How To Get Instant Customer Support On D4Gold.com?
(1) Click "Live Chat" button to contact our 24/7 online customer representative
(2) Send a message to [email protected] and we will respond immediately after receiving your email
Why Is My Payment Pending?
A pending e-check is a type of payment option available with PayPal. A pending e-check is just like writing a normal check, and it usually take 1-7 business days to clear while Paypal verifies the funds are present within the senders account. Once the check is cleared, the money is transferred to D4Gold's account and then your order will be processed immediately thereafter.
What Payment Methods Do D4Gold.com Support?
We provide various payment methods, such as PayPal, Credit Card, and so on, details are as follows:

Can’t find the answer you’re looking for? Please chat to our friendly team.